Monday, June 4, 2012

Sew Crazy

Early on in my pregnancy I had this crazy idea that I was going to sew all my nursery bedding myself. While I know I could have done it, my mom politely reminded me that I don't like to sew all that much.  My instinct was to protest but I knew she was right.  So instead of sewing a whole set, I decided that I wanted to make some sort of keepsake for my first baby and started researching baby quilts.

I've never quilted before so at first I looked at a lot of basic patterns with easy patchwork styles.  While these would be easy, I found them to be really boring.  Then one day when browsing quilts on pinterest I came across Frozen Knickers on Etsy and fell in love with her patterns.  I picked out the dots n' boxes pattern as it goes perfectly with the painted rug I just finished.


I knew right away that I would mimic the grey background and white box border to let the boxes be the star. At first I looked to buy a bunch of fat quarters from Joann's. I quickly learned that most of the patterns were just too small for this kind of quilt. I then started flipping through page after page of fabrics on Spoonflower and Fabric.com.  I was worried about the colors on the screen not matching but decided to take a chance and order 1/4 yards from Fabric.com (Spoonflower was a little pricey for this project).  Here are some of the fabrics I bought:


This particular pattern involved a lot of ironing, cutting, and then sewing in phases.  *Note - I took lots of pictures of this at first but then realized that I was giving the pattern away and didn't want to rip off our Etsy friend at Frozen Knickers.  What I'll tell you is the pattern was clear and the steps were easy, but tedious.  Overall it took me about a month mostly working in the evenings and a weekend or two. The finished front looked great but my lines weren't so straight if you looked up close.  Regardless, I thought it was good enough that I wanted to find someone to quilt all the pieces for me (my Janome isn't that fancy).  A quilting friend at work recommended a nearby quilter who not only put all the pieces together but did the binding too!  Totally worth it in my opinion.  Stay tuned for the finished product!

Friday, March 9, 2012

Shower Curtain curtains

I never really intended for HD to be the place where I shared my own version of diy projects that I find around the blog-o-sphere, but thanks to pinterest, I think I'm finding more projects than there is time to complete them!  The nursery is taking up all my creating time these days and now that we're half way there, the pressure is on.  Since we aren't finding out Baby W's gender and because my baby showers are a few months away, I've been trying to focus on prepping the room.  We have a great double window with plantation (ish) shutters, so all we really needed was a little something to brighten things up.

I've made my own curtains in the past but have learned that the best sewing projects for my skill level are those that dont involve large pieces of fabric.  I was thrilled to come across a really easy tutorial on laybabylay for window curtains made out of shower curtains.  


I found the grey and white shower curtain from West Elm on sale for $33!  I actually bought the citron stripe first but it wasn't quite bright enough so I exchanged it for the grey.  I couldn't believe my luck on this as purchasing fabric alone is often much more expensive than this.


How I did it...first I cut the curtain in half and ironed a 1/2 inch seam on the cut side (left pic). Then I folded these over again, ironed and pinned the edge before sewing (right pic).  *Note - I've found that many design bloggers out there are afraid of sewing seams and instead use iron on tape.  This boggles my mind because I find ironing straight to be the hardest part! While I've never tried the tape, I just want to put out there that this was easy to sew and matches the other side of the curtain (bonus).  The sewing machine is your friend!


Then, instead of hemming the top of the curtain and losing length, I decided to use grommet rings.  I purchased two packs of 1 inch matte black grommets from JoAnns with a coupon.  Side note, I always get excited when I have a 40% off coupon from JoAnns but am immediately discouraged when I get to the store and everything is on sale and therefore, not covered by the coupon.  Anyway, the grommets rarely go on sale so this made my day! The button holes that you typically use for a shower curtain were already centered and evenly spaced so it was easy to cut my holes.  Sew 4 Home suggests doing a zig zag stitch around the hole to keep it from fraying when you wash but I found sewing a 1 inch circle to be way too challenging and just popped the grommet on there.


The finished curtains!  Pretty good for under 40 bucks and less than an hours worth of work. Granted, these are a little shorter than I would normally do for a curtain, and probably why laybabylay suggests adding a contrasting fabric on the bottom, but this wont be a problem for long as I'm planning a window seat/storage bench for below the window.  More on that soon (aka when we finish the project).


Tuesday, February 14, 2012

My painted rug


Im so excited about this project. One of my favorite design blogs,
 almost 40 year old intern, did a really awesome painted rug back in September that I shared when looking for a new living room rug this fall.  Well I never did find a new rug for the living room but I was inspired to try my own painted rug and followed the tutorial to a T.  Here are my steps with some helpful tips:


4X6 Ikea Erslev Rug (still available at the Stoughton Ikea but not online)
Green Frog Tape (so much stickier than the blue)
First I taped off a rectangle, then figured out my measurements. I went for fewer large squares than were done in the almost 40 blog.  It helps to have someone help you get these guiding lines down so they are straight.
 Adding the middle lines
Removing the tape 
At this point hubs said, lets just keep it like this....and I agree that the green trellis looks good.  We kept it for a week while I waited for the fabric medium to come in.  I used 4 containers of the liquitex fabric medium in all and mixed them with 2 pints of paint (poured from a gallon as it was cheaper).  The paint I used is Valspar's Red Tomato and after 1 coat it looked a little streaky.  So I reluctantly painted a second coat, which actually turned out great.  It may be slightly stiffer than a one coat job but looks really good.  I did have some bleeding, which could have come from the second coat or the fact that I taped a week in advance.  Either way its barely noticeable.

The rug is down in our grey room, which was once the office but now transforming into....the nursery!  I'm due in July and baby W will be a surprise so I think the red is a perfect foundation for what I hope will be a bright and modern room.   

I loved this project so much that I've already picked up a second rug for my kitchen!  My mom thinks I should start selling these but I'm not sure about that at 4 months pregnant...

Friday, December 2, 2011

Deck the Halls


December is my favorite time of year.  My birthday, lots of my favorite color (red), good smelling greenery, parties, presents, the list goes on...  One of my favorite traditions is decorating inside and out for Christmas.

This year I'm starting outside.  Without an outside outlet (?!?!) its not so easy to incorporate lighting.  I've got candles in the windows and a wreath on the door but this year, our outdoor decor is getting an upgrade.  It all started (where most projects do) with the latest Pottery Barn catalogue.
                         
Flair without lights, check! But seriously, at $79 for the wreath and $59 for the garland, these are not Christmas budget friendly.  Plus, I'm willing to bet that I can create a similarly awesome version of these items at a fraction of the price...


I spent less than $30 for the whole project!  Even better, I've got a cute holiday dog too.

Sunday, November 6, 2011

Guest Room

The guest room at Hunter Drive actually started out as our master because it has the largest closet.  It is not our largest room and sits in the front of the house so after a few months we moved bedrooms.  Today, the guest room hosts the occasional overnight-er but mostly serves as a dressing room for hubbs because both of our wardrobes do not fit in our present room.  I know, largest closet in the house used as a dressing room, how are my clothes missing out on this?  That story is another blog post...

         
Guest room when we purchased Hunter Drive
Current guest room

Anyway, this is the only room in the house that I did not select the paint color for.  Although its a nice light green, its just not the shade I had in mind.  Its probably best that we didn't get it right the first time around because I wouldn't have thought to paint it the color that I'm currently crushing on...Ralph Lauren's Chocolate Souffle.

November 2011 Country Living found via Cottage and Vine
I know it might be a little dark for this not so large room but I think with some white trim/molding and some colorful accents (most likely the green that I've already got in there) it might make this space nice and cozy.


Wednesday, October 12, 2011

Cold feet contd.

After some measuring I realized that a 5x8 just wasn't going to cut it for the living room.  This became an issue because when you jump to an 8x10 the price jumps too (quite a bit actually).  While the hunt for the perfect living room rug continues, I have found a new rug obsession....painted rugs.  Check out two of my favorite examples from the blog-o-sphere:

               
               Painted rug by Charm Home
Painted rug from the almost 40 year old intern

Let me tell you, there are a lot of other painted rugs out there all using some version of a stencil or tape and the all important erslev rug from Ikea. Who can beat $39.99 for a 5x7 and $59.99 for a 6x9?  Granted these are flat weave and will require a location in our house that needs some floor coverage but doesn't require a cushy pile.  The men in my life, hubbs and pup, like to lay on the floor so comfort is almost as high as aesthetics on the priority list.  So, I'm thinking a painted rug looks like an excellent replacement for our current kitchen rug http://www.llbean.com/llb/shop/39827?feat=902-CL1 (sorry for the link, I'm too embarrassed to include a photo).  Note to self, never purchase a braided wool rug.  Ikea here I come!!

Friday, October 7, 2011

Cold Feet

Most of the rugs at Hunter Drive are hand-me-downs.  And like most things I didn't pick out, I can't wait to buy a replacement.  We have really nice hard wood floors and a dog so I've tried to use rugs sparingly in our home.  Or, more honestly, I'm having a hard time finding the perfect floor covering.  On top of that I'm not thrilled about dropping a couple hundred bucks for something that will just become a haven for dirt and dog hair.  But the real problem is, I have cold feet...literally, so I really need to purchase a new living room rug before the winter.

The living room at Hunter Drive is in transition from the land of beige to a cozy spot with pops of color and new accessories for a look that is more modern than traditional.  A multicolored floral rug isn't going to cut it this time.  I also want to find something that will go with a variety of looks for down the road so I can change the curtains and pillow covers at my choosing.  I've been leaning toward something geometric and black and neutral.  Here are my favorites so far:

Tangier Rug at Ballard Designs $599 for a 6x9
Espana Area Rug in charcoal at Home Decorators Collection $249 for a 5x8
Kite Kilim Rug at West Elm $249 for a 5x8


Which do you like?  I've also been stalking home goods to see if something in my criteria magically appears.  No luck yet, but there are a lot of locations I can check out over a 3 day weekend!


Monday, October 3, 2011

Back Up: what happened to our bathroom?

I started this blog with the idea of showcasing the diy projects hubbs and I were doing around the house.  Tackling the bathroom was the biggest (and longest) project we had done yet and every time I go in there, I still can't believe we did it.  So...here are some before photos to remind you of how outdated and dingy the lone bathroom at Hunter Drive was:


Lets just say it left a lot to be desired (and probably wasn't cleaned enough over the years ever).  Here is the bathroom today:


We started the renovation by just about gutting the whole bathroom.  The only thing we kept was the sheetrock and even that mostly came down.  The layout is exactly the same and was probably the easiest way to go.  What we did:
  • Wainscotting with trim and a custom "ledge" around the whole room, sink alcove and ceiling
  • Changed out the whole vanity and replaced it with a (free) double sink top and custom cabinet
  • New mirrors, lighting and fixtures in sink area
  • Demolished the cast iron tub and tile walls, installed new tub deep soak tub, imported tile and fixtures
  • New toilet and found storage cabinet for over toilet
  • Ripped up linoleum floors and rotten sub floor (yuck), replaced with new tile
Cost?  Probably $3,000 in all.  I think the look is much more expensive and luxurious.  Now if we only had a second bathroom...

Saturday, September 17, 2011

Living Room Re-do Part 1

It's been a little quiet these days at Hunter Drive.  But that's just because I've been busy working instead of blogging!  A couple weeks ago we had an appraisal as part of refinancing our mortgage so hubbs and I were busy finishing up half done projects left and right.  We painted the foundation, planted some new flowers, and even did the finishing touches in the bathroom.  I also got right to work on more living room projects.  Take a look!
Living Room partially done
As I mentioned in the last post, I have recently fallen in love with Antler Damask (on the right most pillow).  It is a "new to me" kind of love, as this print by Joel Dewberry has been out for some time.  I was thrilled to find something traditional but quirky and in such fun colors.  Plus it matches our set of antlers that already hang over the TV.  I made two pillow covers from AD and 4 others in coordinating stripes I scored at Ikea.  I followed Brett Bara's online tutorial to a T.  My zippers dont look all that professional but who can tell?
Pillows in their new covers lined up
I also took down the beige curtains and moved in some red ones from our office.  The color isn't perfect but it works for now.  Left to do on my list is:

  • New rug - a trellis pattern or something else geometric,  maybe black and white
  • More antlers and sportsman accessories for the TV wall
  • 2 new lamp drum shades or another more modern shape
  • Rearranging the corner cupboard - possibly with antlers and trophies?
  • New spot for the oar?
What else?

Wednesday, August 31, 2011

sneak peak

Joel Dewberry's Antler Damask

Just ordered today!!  I'm so pumped for this to arrive in the mail.  If only online shopping allowed for instant gratification...  Who would have though hubbs would go for pink?

Tuesday, August 30, 2011

Striped

The living room at Hunter Drive has been giving me the blahs.  I know we need a full makeover complete with new curtains, pillow shams, rug and more contemporary lighting.  Since I plan to make the curtains and pillows myself it will take some time before things are "fixed".  On Sunday, in the middle of Hurricane Irene, I just couldn't take it anymore.  During a lull in the storm, I jumped in the car and drove to Home Depot (sorry Lowes, I had a gift card) where I purchased some paint and tape to stripe an accent wall in the living room.  I had been following a couple of tutorials on Green Street Blog and Young House Love, which were the inspiration for this project.  I think we're off to a good start! 

Wednesday, August 24, 2011

Grown-ups live here

Before

Beer signs are fun...and they belong in a bar.  They may also be appropriate on the wall in a bachelor pad.  Unfortunately, Hunter Drive does not have a bar, bachelor area or man cave that would provide a proper home for the beer drinking paraphernalia that my husband has collected over the years.  I've been slowly moving our menagerie of beer signs to the basement stairway because hey, grown-ups live here.

The last sign to go is our beloved Narragansett beer girl, who presides over the kitchen table.  I figured moving her would be a struggle and I would have to come up with something really great and pretty inexpensive to take her place.

After
During a local summer sidewalk sale I found printed fruit from the US Department of Agriculture Yearbook from the early 1900's (facebook for fruit).  Each page was around $12 each and I found 8 that looked terrific together.  They were just pages ripped out of a book and kind of an odd shape for a typical frame, so I got lucky re-using four cheap document frames that I had purchased for $3.99 at Walgreens back in college.  Wouldn't ya know, I found 4 more of the exact same frames on amazon for the same price!  Best of all, the "mat" is just the back cardboard flipped around.  Pretty good huh?


Monday, August 22, 2011

Movin' on Up!

Facade of Hunter Drive
Hunter Drive is a three bedroom ranch that is the perfect size for our family of three (me, hubby and our dog Wally).  Since move in day, New Years 2009, we've been working on house projects non-stop.  At first I did a lot of complaining...ok, major complaining, about doing the work ourselves.  While I've always been crafty, I just didn't grow up in the type of household where you laid your own wood floor and installed your own windows (yes, we've since done both).  Now, almost 3 years later, I feel we can take on any house project, even a second story addition!

While we certainly wont build up by ourselves, we are interested in doing as much of the work as possible to keep to our budget.  We're in a good location with a great yard so I'm hoping we can add enough space to make Hunter Drive a place that a family can grow into.  With a ranch, there are so many addition options and I'm determined to avoid a flat colonial at all costs.  Here are some of my favorite facades:

A renovation in Hingham, MA with a before that looks just like Hunter Drive

A ranch renovation in Arlington Heights, IL
Can you see it?  I think its all about the front porch and an interesting roof line.  I'm sure an architect would come up with a number of other alternatives as well.  I can't wait till we get started on this!

Wednesday, August 10, 2011

Neutral Nursery

I recently joined One Kings Lane, a discount designer site for the home.  And I have to say, where has this been all my life?? 

While many of the items on the site are above my price range (even with the discounts offered), I was pleased to see that there were many home accessories that are absolutely affordable.  The gorgeous yellow pom pom throw in the inspiration board below is currently on sale this week for only $39.99!  

A couple posts ago I mentioned the idea of converting our office into a nursery.  With perfect grey walls, canary yellow and white accents would look fantastic.  I know that yellow and grey is by no means a new combination for home decor, wedding colors, etc. but I haven't seen much of it for a nursery.  I can just imagine a long list of DIY projects starting up: fun yellow print curtains and a quilt, martha stewart's tissue paper pom poms hanging in a corner, a knit pouf for a foot stool.  Could all this be done in 9 months?  
    

Wednesday, August 3, 2011

Dining Dreams

The biggest bummer at Hunter Drive is the lack of a dining room.  Our "eat in kitchen" really allows us to have just one couple over at a time for dinner, which doesn't cut it for an entertainer like me.  With our plans for a some day second story, I've been saving ideas and looks I love for a functional, stylish but not too formal eating space.

The current living room would make for a generous dining area and I love the idea of adding some bookcases to make the space cozy.  I love the way these book cases are used to organize and add color to the white walls.

I think this look would be totally doable in our future dining room.  This is the window I have in mind...

taken by my iphone

Besides needing a better camera to document Hunter Drive, its pretty clear that my existing living room is suffering from the beige on beige syndrome.  All the more reason to start planning for the dining room now!


Friday, July 29, 2011

Sucker for Stencils

When I was a kid, my mom and close friend started a stenciling business - sweatshirts, tote bags, and the ever popular room border.  This was definitely a trend at the time, and today I'm surprised to find myself plotting out my own stencil projects.  It all started with Schumaker's Imperial Trellis ...


The Schumacher fabric of my dreams was turned into a too small stencil that must have taken hours to cover a full wall.  Check out Hello Gorgeous for the full how-to and final project photos.

While I love this project, I'm not sure I have the patience or dedication to create my own stencil.  Regardless, I was actually contemplating trying this out, until I found three companies that make this project a whole lot easier for just 40 bucks!  Here are some of my favorites so far:

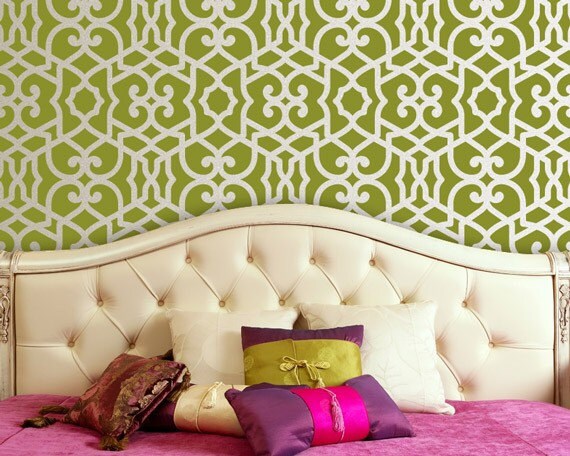
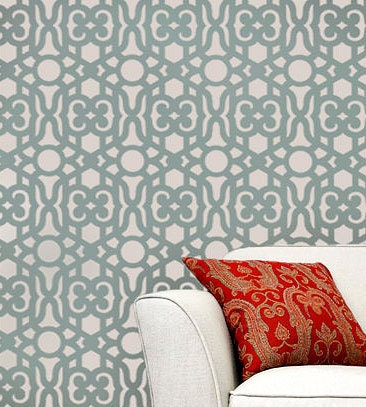
Nautical Chain Pattern at Olive Leaf Studio

Large Chez Sheik Allover by Royal Design Studio

Covington by Cutting Edge Stencils via Etsy

Fancy, traditional or modern?  Which stencil and which wall shall I choose?

Thursday, July 28, 2011

Eventual Office Overhaul

The office at Hunter Drive has unfortunately served as the junk room/laundry room/yard sale staging room since the day we moved in.  With the absence of a garage I consider this type of disorganized space to be a necessary evil, but also a shame as the wall color in this room is my absolute favorite shade of grey (it's Valspar's Polished Silver).

While we've had a lot of ideas for the office, we've decided to hold off on any major changes in anticipation that this will one day be a nursery. And no, we are NOT pregnant.

I know grey walls for a baby might seem a little drab but the possibilities are endless for a modern, gender neutral space with lots of fun and colorful accessories.  Here are some inspiring spaces I've found online:
found via back {to}domestics
A nursery in progress by a friend from high school via the facts of Lauren


Project Nursery by wyattsmom


Project Nursery by mscott218

Oooh this is going to be so much fun!  From watching my friends and sister-in-laws prepare for new babies I know this will someday be a huge life change.  For now, I'll just dream about the decorating...